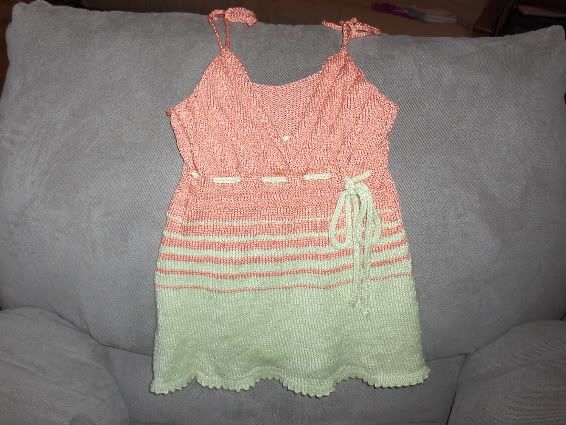
This is beta version of my tank pattern. I am still working on sizing and proof reading, but I thought I would get up the size medium pattern up right away in case some brove soul decided that they have the yarn laying around and wants to help me develop this pattern. I plan tearing the pictured tank apart and reknitting it entirely in "Celia". I found that I really don't that alpaca and silk against my skin, but you can't deny silk. I did not include the pattern for the two colors, if you are interested let me know. I will update this pattern as it evolves and as I do the math for every size so if you are not a size medium check back in a week or so I should have the math done for all sizes. I think that I have all the abbreviations but let me know if I'm missing something, or if you see any mistakes. Also I would love to see what other people do with my pattern and you make it your own, so please post pics if you knit it! After all I believe patterns are just an idea and a guide.
Knitting abbreviations
pm-place marker
sm- slip marker
ssk- slip slip knit slipped st tog through the back loop
k2tog- knit 2 togther
p2tog- purl 2 together
Sizes
Medium
Materials
Any sport weight yarn is suitable, I used 2 hanks Blue Sky Alpaca’s “Alpaca and Silk” and 3 skeins Adrienne Vittadini “Celia.” Yardage for this project should be about 500-600 yards sport or dk weight yarn depending on size.
Size 6 24” circular needles
Size 6 strait cable needles (optional)
Size G crochet hook
Size 6 dp needles or other method of forming I-cord
Finished measurements
Bust 36
Waist 28
Gauge
22 st and 28 rows= 4x4” on size 6 needles
TAKE TIME TO CHECK GUAGE
Notes:
This top is knit circularly from the bottom up and then splits at the waist to form cups
Be sure to read entire pattern before starting
If you are uncomfortable using the provisional cast on, you can either pick up stitches from the cast on edge or sew the hem up in the finishing stage
When removing waste yarn from provisional cast on, remove one stitch at a time to prevent dropped stitches. Knit one live stitch together with one stitch from the cast on
When forming cup you can pick up stitches instead of casting on. I recommend switching to strait cable end needles. Pick up stitches from the purl bumps of the row below (on the wrong side of the fabric)
If you are or knitting for a very busty lady, you may want to make more than the stated amount of stitches when shaping cups to accommodate a larger bust
Diagonal Pattern for cups
For left leaning diagonal: Row 1 (ws): knit the knit stitches and purl the purl stitches
Row 2 (rs): sl, ssk, k3, then *p5, k5 rep from * to marker
Right leaning diagonal:
Row 1 (ws): knit the knit st and purl the purl st
Row 2 (rs): k2, *p5, k5 rep form * to last 6 st k3, k2tog, k1
Row 3: rep row 1
Row 4: rep row 2, but shift sts 1 st to right
Knitted Hem
Using provisional cast on and waste yarn cast on 220 st. Join being careful not to twist, pm
Row 1: K110, pm, K to end
Row 2-6: K
Row 7: (picket edge) *yo, k2tog rep from * to end
Row 8-13: K
Row 14: remove waste yarn from provisional cast on. K2tog with co st
Row 15-17: K
Row 18: (dec row) k1, ssk, k to 3 st before marker, k2tog, k1, sm, k1, ssk, k to last 3 st, k2tog, k1
Row 19-22: K
Repeat rows 18-22 14 more times (160 st remain) Work even until piece measures 11”
Next 3 rows: p
Next 3 rows: k
Next 3 rows: p
Next row: k
Next row (eyelet row): *yo k2tog k6 rep from * to end
Next row: k
Shape cups
Next row: k28, pm, k25, *k1.m1 rep from * 5 times, k to marker, sm, k80 across back, sm, k18,*m1, k1 rep from * 5 times, k1, pick up or cast on 24 st, turn
Next row (ws): begin left leaning diagonal st pattern, sm, k 80 across back, sm begin right leaning diagonal st pattern
Continue in diagonal patterns on cup working St st across back st. until back measures 3” from eyelet row
Shape armholes
Next row (rs): work even in diagonal pattern to 5 st before marker, BO 5 remove marker, BO 25, with crochet hook ch 65, turn sl st into each ch st (65 st) cont BO, BO 30 st, ch 65, turn sl st into each ch st (65 st), cont BO, BO 25 st, remove marker, BO 5 st, cont in established pattern
Cups will be worked separately from now on.
Next row (right leaning cup, ws): work even to last 5 st, p to end
Next row: sl 1, ssk, ssk, cont in pattern to end
Repeat these two rows 2 more times
Next row (ws): work even to last 3 st, p to end
Next row: sl 1, ssk, cont in pattern to end
Repeat these two rows til 12 st remain
Next row (ws): sl 1, p2tog, p2, k4, p2tog, p1 (10 st)
Next row: sl 1, ssk, p3, k1, k2tog, k1 (8 st)
Next row: sl 1, p2tog, k2, p2tog, p1 (6 st)
Next row: sl 1, ssk, k2tog, k1 (4 st)
Next row: sl 1, p2tog, k1 (3 st)
Next row: sl 2 purlwise, k1, psso
Ch 65, turn, sl st in each ch, (65 st)
BO
Left leaning cup
Join new ball of yarn, start first row on wrong side
Next row (ws): p5, cont even in pattern
Next row: cont in patt to last 5 st, k2tog, k2tog, k1
Repeat these two rows 2 more times
Next row (ws): p3, cont even in pattern
Next row: cont even in pattern to last 3 st, k2tog, k1
Repeat these two rows til 12 st remain
Next row (ws): sl 1, p2tog, k4, p2, p2tog, p1 (10 st)
Next row: sl 1, k2tog, k1, p3, ssk, k1 (8 st)
Next row: sl 1, p2tog, k2, p2tog, p1 (6 st)
Next row: sl 1, k2tog, ssk, k1 (4 st)
Next row: sl 1, p2tog, k1 (3 st)
Next row: sl 2 purlwise, k1, psso
Ch 65, turn, sl st in each ch, (65 st)
BO
Make Waist tie
Make 60” I-cord, weave through eyelet row place ends and tie where desired
Finishing
Weave in all ends, block and tie straps. Sew hems and right leaning cup down behind left leaning cup.
No comments:
Post a Comment